
尺度不变特征变换匹配算法SIFT
e-mail:chentravelling@163.com
SIFT算法
SIFT算法即尺度不变特征转换(Scale-invariant feature transform),本文重点不阐述该算法的原理,想要了解原理的朋友可以参考另一篇比较详细的CSDN文章(戳这里查看),该篇文章讲述的比较详细。
SIFT算法主要分为五个步骤:
(1)建立尺度空间,检测图像极值点:通过高斯微分函数建立尺度空间,通过高斯差分尺度空间(DoG scale-space)检测图像局部极值点。
(2)去除不稳定点,确定关键点:不稳定点主要为不稳定的边缘点和低对比度的关键点,Dacid G.Lowe通过拟合二阶微分方程的方法排除低对比度点,同时可采用Harris角点检测方法去除不稳定的边缘点。
(3)确定关键点的方向:主要原理是统计关键点领域所有的梯度方向直方图,以直方图中最大值作为该关键点的主方向,同时为了提高后续匹配的鲁棒性,将直方图中峰值超过主峰80%的方向作为该关键点的辅方向。
(4)提取关键点描述符
(5)关键点匹配:才用特征向量之间的欧氏距离评估关键点之间的相似性程度。那么这里会通过一个预设的阈值进行过滤,阈值的设置直接影响到匹配点的数量和精确性。一般阈值的选择为0.7~0.8之间。
为了更好的看到SIFT算法的效果,可以实践一下。
C++代码
环境:vs2010+opencv2.3.1+win7 ×64
#include <opencv2/opencv.hpp>
#include <istream>
using namespace std;
using namespace cv;
int main()
{
//read the two input images
Mat image1 = imread("image1.jpg");
Mat image2 = imread("image2.jpg");
//if failed
if(image1.empty()||image2.empty())
{
cout<<"error,the image is not exist"<<endl;
return -1;
}
//difine a sift detector
SiftFeatureDetector siftDetector;
//store key points
vector<KeyPoint> keypoint1,keypoint2;
//detect image with SIFT,get key points
siftDetector.detect(image1,keypoint1);
Mat outImage1;
//draw key points at the out image and show to the user
drawKeypoints(image1,keypoint1,outImage1,Scalar(255,0,0));
imshow("original_image1",image1);
imshow("sift_image1",outImage1);
Mat outImage2;
siftDetector.detect(image2,keypoint2);
drawKeypoints(image2,keypoint2,outImage2,Scalar(255,0,0));
imshow("sift_image2.jpg",outImage2);
//imwrite("sift_result2.jpg",outImage2);
//store 10 keypoints in order to watch the effect clearly
vector<KeyPoint> keypoint3,keypoint4;
for(int i=0;i<10;i++)
{
keypoint3.push_back(keypoint1[i]);
keypoint4.push_back(keypoint2[i]);
}
// difine a sift descriptor extractor
SiftDescriptorExtractor extractor;
//store the descriptor of each image
Mat descriptor1,descriptor2;
BruteForceMatcher<L2<float>> matcher;
vector<DMatch> matches;
Mat img_matches;
//compute the descriptor of each image
extractor.compute(image1,keypoint3,descriptor1);
extractor.compute(image2,keypoint4,descriptor2);
//match
matcher.match(descriptor1,descriptor2,matches);
//show the result
drawMatches(image1,keypoint3,image2,keypoint4,matches,img_matches,Scalar(255,0,0));
imshow("matches",img_matches);
//store the match_image
//imwrite("matches.jpg",img_matches);
waitKey(0);
return 0;
}
运行效果
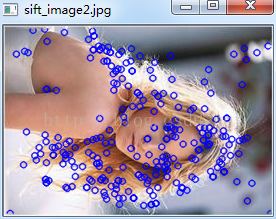
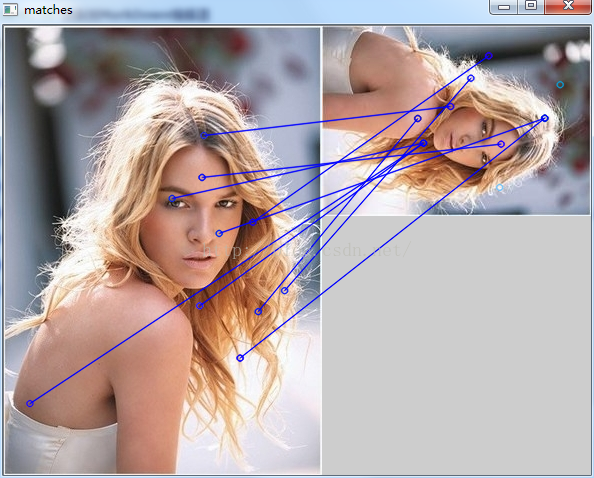
依次为:原图,原图sift后,原图经缩放旋转再sift后,匹配结果


为了清晰看出匹配点之间的连线关系,程序中只是从每一幅图的SIFT关键点中选择了10个关键点,而且是下标相对应的10个点,从理论上来讲,可能存在一些问题,就是这些点实际上本就不是对应的匹配点,所以可能这也是造成匹配结果有误的原因。
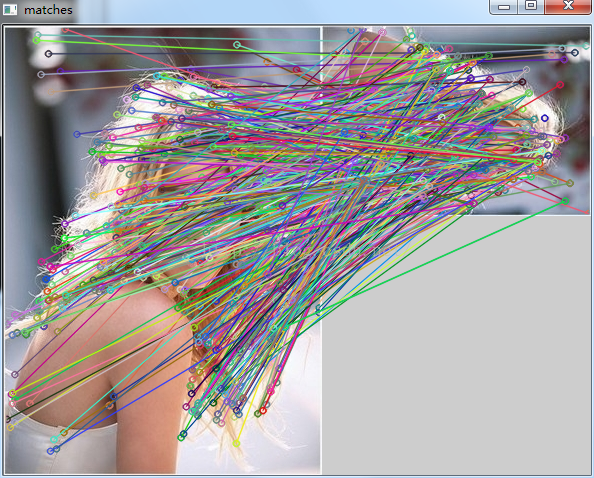
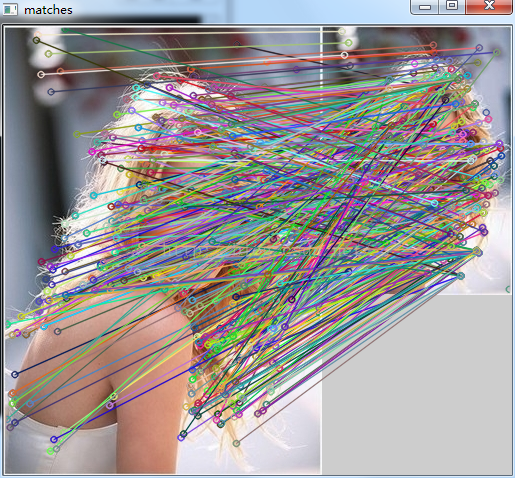
那么如果我们把所有的关键点都进行匹配,效果如下:
依次为:原图和原图&缩放旋转后匹配,原图和原图&缩放后匹配。


从这两张匹配后的图中也可以看出,同样是存在错误匹配的。
————————————————
版权声明:本文为CSDN博主「生活没有if-else」的原创文章,遵循 CC 4.0 BY-SA 版权协议,转载请附上原文出处链接及本声明。
原文链接:https://blog.csdn.net/chentravelling/article/details/48974051
 cruboy